A few years ago I bought an infrared (IR) phototransistor and an IR LED for about £2 from Maplin, although I never ended up making anything exciting with them, they were great fun to play with as one of my first electronics experiments.
In the past year of lockdown – with not much else to do in the evenings – I’ve been watching a lot more TV. Now I’m not sure how normal this is, but to turn anything on on our telly requires at least 3 different remotes (one for the screen, one for the audio and one for either the TiVo, Apple TV or DVD player). As someone sensible realised quite a few years ago, this issue can be solved with a universal remote! Now I don’t have one of those… but I have just ordered at LilyGo TTGO T-Watch 2020 v1, which is a fully programmable smart watch with an esp32 chip on board and happens to also have an IR LED! So the plan is to eventually program the watch to be able to send the power-on command to all of the devices needed at once.
Before I can do any of that though, I need a way to learn the commands from the different remotes! There are some databases with this information on online (remotecentral.com) – though the details can be hard to find for certain remotes and the format they give the codes in can be a little confusing! So instead I’ll be using that IR phototransistor from earlier as well as some other things:
- ESP32 development board (I have an esp32-doit-devkit-v1 but anything will work)
- Breadboard
- Infrared phototransistor that detects 940nm light
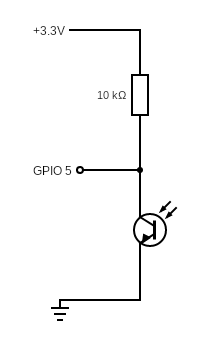
- 10KOhm resistor – or something in that ballpark (I have a 9.1KOhm one I think!)
- Jumper wires
If instead you would rather use an Arduino – then not much needs to be changed and I will point out at the end what changes you’ll need to make.
The first step is of course to wire everything up! Note that when infrared light is being detected the input to the device will be 0, and it will be 1 when no light is detected. I’ll assume you know how to read circuit diagrams – if not then it’s an easy Google away – as you can see this is really really simple:
Now that that’s done it’s time to write some code! First lets’ have a look at how remotes send their signals. Here’s the signal trace for the NEC transmission protocol which lots of remotes use:
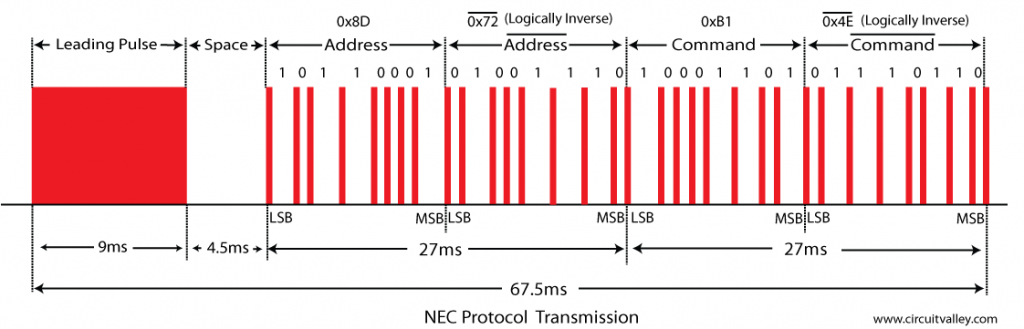
One of the first things you’ll notice is the redundancy in this – the address and command codes are sent first in their normal form, and then with the logical inverse. This is so that if the remote is far away and the receiver accidentally misreads a bit, it will hopefully notice that there is a mistake in one of the two versions and ignore the command (instead of accidentally doing the wrong one).
Another important thing to note is that the LED flashes on and off really really quickly – the more switching on and of there is, the easier it is for the receiver to remove noise from the signal. Therefore this protocol uses a short pulse and a short pause to designate a 0 and a short pulse followed by a long pulse for a 1 – this way every bit involves turning the led on. In fact these “pulses” are actually the LED flashing at around 37KHz (depending on the remote) but for our purposes we can just view at as “on” (this is a bit of a bodge that works due to the phototransistor taking so long to switch that if we sample the value at some point in that pulse we’ll end up detecting a 1)
All this cleverness is how the remote still work even when you point it at the ceiling or the opposite wall. This is helped by some additional circuitry which we don’t have that filters out all signals from ceiling lights and anything else not pulsing at 37KHz. You can buy these as “IR Receivers” but I didn’t have one… If you do buy one of these though it might be a little more reliable!
Both the pulse and space widths are typically around 500 microseconds or multiples thereof and the receivers should be able to cope with a 10% error. So, our approach to this problem is going to be to sample the input value on pin 7 every 50 microseconds and see if the remote is transmitting or not in that time. From this information we can work out the durations of each pulse and space – which can later be played back!
Let’s set everything up to write the code. I’m doing all this using platformio and so will be using their default file layout. After downloading the command line version create a new directory where you want the project to live, navigate to it and run pio project init --board esp32doit-devkit-v1 --ide vscode which will create a nice file structure for you. Adjust the board and ide values depending on your environment (or leave ide blank if you’re not using one).
Now you can just copy my code from github and clone that into lib/RemoteReader (in which case you only need to create the main.cpp file). But it’s more fun to write along with me! So create the files include/RemoteReader.h, src/RemoteReader.cpp and src/main.cpp
Let’s concern ourselves with the sampling code first. So to RemoteReader.h add the following:
#ifndef _REMOTE_READER_H_
    #define _REMOTE_READER_H_
// ^^ This prevents accidental include loops
// ^^ Keep at the very top of the file

#include "Arduino.h"

// How often in microseconds to call the sample function
#define GAP_BETWEEN_SAMPLES 50

// How many transitions in the longest signals
#define MAX_NUMBER_OF_TRANSITIONS 100

// Sets the minimum length in microseconds of the gap between codes
// This is needed to distinguish betweeen a space betwen pulses and
// the gap between codes
#define MINIMUM_GAP_TIME 5000
#define MIN_GAP_LENGTH (MINIMUM_GAP_TIME/GAP_BETWEEN_SAMPLES)

// The input is 0 when the IR LED is pulsing
#define PULSE 0
#define SPACE 1

// These states are used in the interurupt handler
#define STATE_IDLE     2
#define STATE_PULSING  3
#define STATE_SPACE    4
#define STATE_STOP     5

// information for the interrupt handler
typedef struct {
  // pin for IR data from detector
  uint8_t receiverPin;

  // the current state
  uint8_t receiverState;

  // increments on every interrupt
  unsigned int timer;

  // stores length of pulses and spaces
  unsigned int timings[MAX_NUMBER_OF_TRANSITIONS];

  // how many entries there are in timings buffer
  uint8_t length;
}
irparams_t;

// vv Part of the "#ifndef _REMOTE_READER_H_" at the top
// vv Keep at the very end of the file
#endif
The interrupt code will be a simple state machine which has access to an irparams_t struct. Depending on what the current receiverState is and the value read from receiverPin, it can do one or more of the following: add a new timing to the timings buffer, change the state, and do nothing. The timer is used to keep track of how many times the interrupt code has run since the last state change. These timings get saved into the timings buffer, so that the sequence of pulses and spaces can be later replayed.
Let’s add this sate machine to the src/RemoteReader.cpp file:
#include "RemoteReader.h"

// the irparams_t struct that the interrupt code can access
volatile irparams_t irparams;

// the IRAM_ATTR ensures that this code is always kept in
// RAM not on the Flash storage (so that it can start fast)
void IRAM_ATTR sampleInput()
{
    // this reads the current value from the IR photransistor
    // it's cast to uint8_t so that comparisons are quicker
    uint8_t irdata = (uint8_t)digitalRead(irparams.receiverPin);

    // increments timer to keep track of how long in this state
    irparams.timer++;

    // Checks to see if there has been a bufferoverflow
    if (irparams.length >= MAX_NUMBER_OF_TRANSITIONS) {
        irparams.receiverState = STATE_STOP;
    }

    // The state machine code
    switch(irparams.receiverState) {

    // Haven't yet detected a pulse since started looking
    case STATE_IDLE:
        if (irdata == PULSE) {
            // Ensure pulse not part of the last code
            if (irparams.timer < MIN_GAP_LENGTH) {
                irparams.timer = 0;
            }

            // A new code has started to be sent
            else {
                // length is 0 as start of code
                irparams.length = 0;
                // reset timer
                irparams.timer = 0;
                // update state
                irparams.receiverState = STATE_PULSING;
            }
        }
        break;

    // The remote was pulsing on last interrupt
    case STATE_PULSING:
        // PULSE ended
        if (irdata == SPACE) {
            // save how long the pulse lasted
            irparams.timings[irparams.length++] = irparams.timer;
            // reset timer
            irparams.timer = 0;
            // uodate state
            irparams.receiverState = STATE_SPACE;
        }
        // otherwise still pulsing
        break;

    // The remote wasn't transmitting on last interrupt
    case STATE_SPACE:
        // SPACE ended
        if (irdata == PULSE) {
            // save how long the space lasted
            irparams.timings[irparams.length++] = irparams.timer;
            // reset timer
            irparams.timer = 0;
            // update state
            irparams.receiverState = STATE_PULSING;
        }
        // SPACE not ended
        else {
            // check whether the space has been long enough to
            // be the gap after the end of a code
            if (irparams.timer > MIN_GAP_LENGTH) {
                // set state to STOP to indicate end of code
                irparams.receiverState = STATE_STOP;
            }
        }
        break;

    // Not looking for a code any more
    // Can now read the data from the timings buffer
    // Set the state to IDLE to restart
    case STATE_STOP:
        // If pulses take place reset the timer
        // Needed to prevent reading part-codes after restart
        if (irdata == PULSE) {
            irparams.timer = 0;
        }
        break;
    }
}
So our plan is to trigger the sampleInput() function every 50 microseconds. Whenever, irparams.state is STATE_STOP then there is a code to be read from the timings buffer! Lets create a class to handle all of this in include/RemoteReader.h. Add the following just before the #endif:
// This will store the information from one code
class IRCode {
public:
    // stores length of pulses and spaces
    volatile unsigned int *timings;

    // how many entries there are in timings buffer
    int length;
};

// This class abstracts away the code reading
class RemoteReader
{
public:
    // Constructor to set the input pin number
    RemoteReader(int receiverPin);
    // Sets up the interrupt timer to trigger sampleInput()
    void enableIRIn();

    // Copies the code information from irparams to results
    int readCode(IRCode *results);

private:
    // Indicates that new codes can be read
    void resume();
};
This nicely abstracts away the complexity of the interrupt stuff. Now to use this, we just need to create a RemoteReader object and call enableIRIn to start reading codes. To find out what codes have been read create an IRCode object and call readCode with it as the argument. To implement these functions first add the following to the top of src/RemoteReader.cpp:
#include "esp32-hal-timer.h"Then at the bottom add:
// A hardware timer that we'll setup to trigger sampleInput()
hw_timer_t * timer = NULL;

// The constructor - used to set the input pin number
RemoteReader::RemoteReader(int receiverPin)
{
    irparams.receiverPin = receiverPin;
}

// Starts the timer that triggers sampleInput()
void RemoteReader::enableIRIn()
{
    // Mark the input pin as an input pin
    pinMode(irparams.receiverPin, INPUT);

    //Creates a timer that increments every 80 APB_CLK cycles
    //The APB_CLK on the esp32 has a default speed of 80MHz
    //So this timer increments every 1 microsecond
    timer = timerBegin(0, 80, true);

    // Attach the sample function to our timer
    timerAttachInterrupt(timer, &sampleInput, true);

    // Trigger the interupt every GAP_BETWEEN_SAMPLES microsecs
    // "true" indicates that this timer should repeat
    timerAlarmWrite(timer, GAP_BETWEEN_SAMPLES, true);

    // Setup initial values in irparams
    irparams.timer = 0;
    irparams.length = 0;
    irparams.receiverState = STATE_IDLE;

    // Enables the interrupts
    timerAlarmEnable(timer);
    // sampleInput() is now being called every interrupt!!!
}

// Used to indicate that new codes can now be read
void RemoteReader::resume()
{
    // reset irparam values to initial state
    irparams.length = 0;
    irparams.receiverState = STATE_IDLE;
    // note that timer not set to 0 as have been
    // keeping track of time since last pulse
}

// Decodes the received IR message
// Returns 0 if no data ready, 1 if data ready.
// Results of decoding are stored in results
int RemoteReader::readCode(IRCode *results)
{
    // has a complete code been read in
    if (irparams.receiverState != STATE_STOP) {
        // failed to store data
        return 0;
    }
    // data is ready to be read
    // copy the lengths of pulses and spaces to results
    results->timings = irparams.timings;
    results->length = irparams.length;

    // indicate that new data can now be read
    resume();

    // successfully stored data
    return 1;
}
We’re almost ready to use this!! However first we need some way to print out the timing data so that the codes can be send from the watch at a later date. To do this I’m going to use the arduino Serial stuff. So add the folowing to the top of include/RemoteReader.cpp:
#include "HardwareSerial.h"Then inside the RemoteReader class definition, add the following:
public:
    // Prints out the timing data to the serial port
    static void sendToSerial(IRCode *results);
And to src/RemoteReader.cpp add this at the bottom:
// Prints out the timing data to the serial port
void RemoteReader::sendToSerial(IRCode *results)
{
    // Send the number of pulses and spaces in the code
    int count = results->length;
    Serial.print("Size of transmission: ");
    Serial.println(count);

    // Now send the length of each of these
    for (int i = 0; i < count; i++) {
        // The timings alternate between pulses and spaces
        // Pulses will be indicated by positive numbers
        // Spaces will the indicated by negative ones
        if ((i % 2) == 0) {
            // is a pulse duration
            Serial.print(results->timings[i]*GAP_BETWEEN_SAMPLES, DEC);
        }
        else {
            // is a space duration
            Serial.print(-(int)results->timings[i]*GAP_BETWEEN_SAMPLES, DEC);
        }
        // adds spacing between the numbers
        Serial.print(" ");
    }

    // sends a newline character at end of the code
    Serial.println("");
}
That’s all of that sorted! As mentioned earlier, this is really simple to use. To src/main.cpp place the following:
#include "Arduino.h"
#include "HardwareSerial.h"
#include "RemoteReader.h"

// the pin you have the input going to
#define RECVPIN 5

// a RemoteReader that uses this pin
RemoteReader reader(RECVPIN);

// the object to store the remote code timings in
IRCode code;

// Called on startup
void setup()
{
    // setup the serial port
    Serial.begin(9600);
    // start reading codes
    reader.enableIRIn();
}

// run's in a loop forever
void loop()
{
    // spins until readCode = 1
    // i.e. that a code has been read
    if(reader.readCode(&code))
    {
        // sends the code information to the serial port
        RemoteReader::sendToSerial(&code);
    }
}
All done!! To upload this to your device run pio run -t upload and to print out what’s being received on the serial port use pio device monitor. When I run this and press the power button on our Oppo DVD Player remote I get the following output:
Size of transmission: 67
 9050 -4500 550 -1650 600 -550 550 -550 600 -1650 550 -550 600 -550 550 -1650 600 -550 550 -550 550 -1700 550 -1650 600 -550 550 -1650 600 -1650 600 -500 600 -1650 600 -500 600 -1650 600 -500 600 -1650 600 -1600 600 -550 600 -500 600 -500 600 -1650 600 -500 600 -1650 600 -500 600 -550 600 -1600 600 -1650 600 -1650 600
Which if you compare to the NEC Remote protocol specification you’ll see is close enough to a valid signal!
As promised earlier: if you’d like to use an Arduino or any other device then you’ll need to change a couple of things. Firstly change the board flag in the pio init command. Secondly you’ll need to edit the function RemoteReader::EnableIRin(), since you can’t make use of the esp32 timers. There should be some equivalent way, however, of attaching the sampleInput() function to a timer interrupt.
There are a few improvements that could be made to this code. Firstly we detect when a new code has been read by repeatedly checking (polling) the state of irparams.receiverState. This could very much be done less frequently, and there’s probably a way to go to sleep until the state changes to STOP. Secondly the EnableIRin function uses the 1st of the esp32’s 4 available timers – so anything else running at the same time as this will have to leave that free. This could easily be changed by adding some checks and an argument to the function that indicates which timer you want. I’ve not bothered with either of these things though as this was only meant to be a temporary setup to record some information for the later project with the LilyGo TTGO T-Watch 2020.
Sections of this code were based on NECIRrcv by Eduardo Cáceres